Transferring a domain name can seem like a daunting task, but it’s actually a straightforward process when you follow the right steps. Whether you’re moving your domain to a new registrar for better pricing, improved customer support, or a more user-friendly experience, understanding how to transfer a domain name is essential for maintaining control over your online presence.
In this post, we will guide you through the step-by-step process of transferring a domain name, from preparing your domain for transfer to finalizing the transfer with your new registrar. We’ll break it down in simple, easy-to-follow steps, ensuring that your domain transfer is seamless.
1. Why Transfer a Domain Name?
Before diving into the steps, it’s important to understand why you might want to transfer your domain in the first place. There are several reasons why people transfer domains, including:
- Better pricing: You may find a registrar offering lower renewal rates or special deals.
- Customer support: If you’re unhappy with your current registrar’s support, you might switch to one with better service.
- Ease of management: A new registrar might provide better tools or a more user-friendly interface.
- Consolidation: You may want to manage all your domains under a single registrar for simplicity.
Now that we understand why you might want to transfer a domain, let’s move on to the actual process.
2. Preparation for the Domain Transfer

The first step in transferring a domain name is to make sure it’s ready for the transfer process. Here’s what you need to do:
1. Make Sure the Domain Is Eligible for Transfer
Not all domains are eligible for transfer right away. Some important conditions to check before initiating the transfer include:
- Domain age: The domain must be at least 60 days old. This is a rule set by ICANN (the organization that governs domain names).
- Domain must be unlocked: Domains are usually locked by default to prevent unauthorized transfers. You’ll need to unlock it with your current registrar before transferring.
- No recent transfers: If you’ve recently transferred the domain, you may have to wait at least 60 days before transferring it again.
- No disputes or holds: If there are any legal disputes, holds, or other issues with the domain, it may not be eligible for transfer.
2. Update Your Domain’s Contact Information
Before transferring, double-check that your contact information (especially the email address) is up-to-date with the current registrar. This is important because the transfer approval process often involves receiving confirmation emails at this address.
- Log in to your domain registrar’s account.
- Go to the contact settings and ensure that the administrative contact email address is correct.
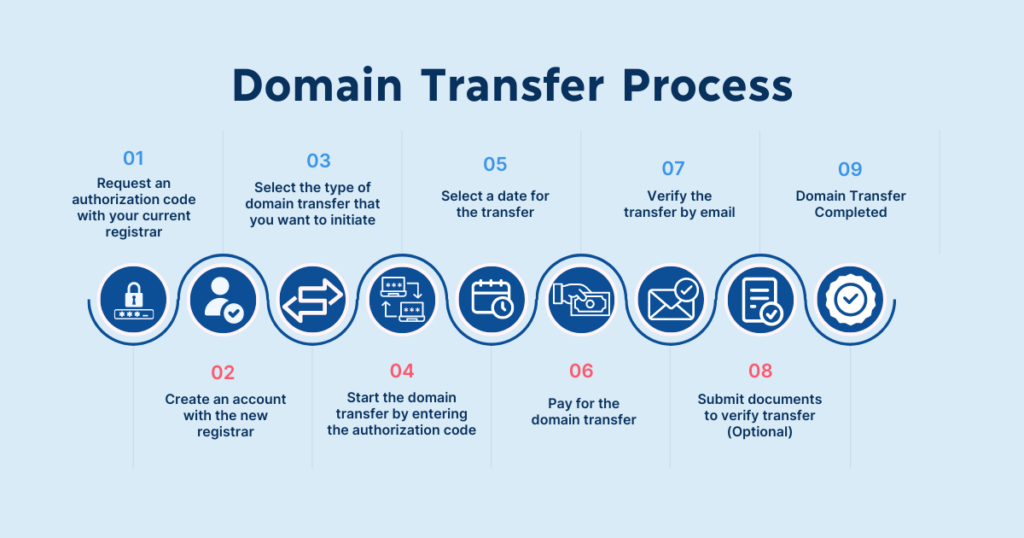
3. Obtain the Authorization Code (EPP Code)
The EPP code (also known as an Authorization Code or Transfer Key) is a unique security code that proves you have authority to transfer the domain. You’ll need to get this code from your current registrar.
- Log in to your registrar’s account.
- Navigate to the domain settings or transfer section.
- Request or view the EPP code for your domain.
- Keep this code handy, as you’ll need it when you initiate the transfer with the new registrar.
4. Turn Off Domain Privacy Protection (if applicable)
If you have domain privacy protection enabled (also known as Whois protection), you may need to disable it for the transfer to go through. This is because, during the transfer process, the registrar needs to verify the domain’s contact information, and domain privacy protection hides that information.
- Go to your registrar’s domain settings and turn off privacy protection.
- Once the transfer is complete, you can turn privacy protection back on if desired.
3. Initiating the Domain Transfer

Once you’ve completed the necessary preparations, it’s time to initiate the transfer. Here’s how to do it:
1. Choose Your New Registrar
First, you need to decide where you want to transfer your domain. Some of the most popular domain registrars include:
- GoDaddy
- Namecheap
- Bluehost
- Google Domains
- HostGator
Compare features such as pricing, customer support, and additional services offered before making your choice.
2. Start the Transfer with Your New Registrar
Now that you’ve selected your new registrar, you can begin the transfer process. Each registrar will have a slightly different process, but here are the general steps:
- Go to your new registrar’s website and log in to your account.
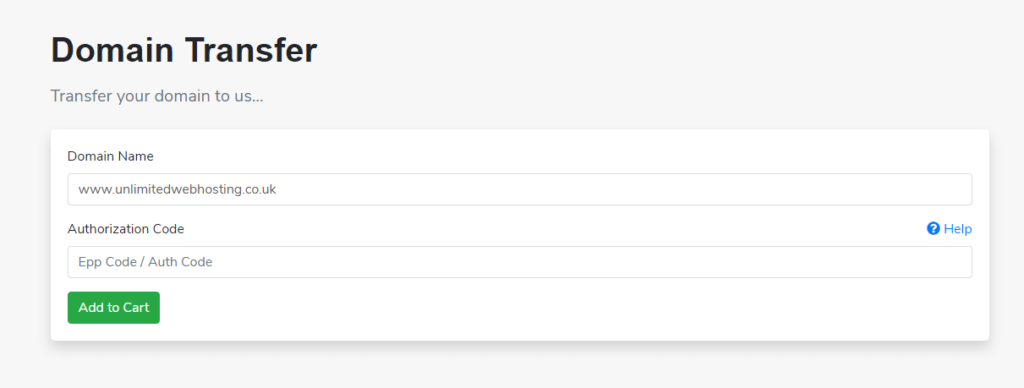
- Look for an option to transfer a domain to their platform (often found in the domain management section).
- Enter the domain name you want to transfer and follow the on-screen instructions.
3. Provide the EPP Code
When prompted, enter the Authorization Code (EPP code) that you obtained earlier from your old registrar. This step proves that you have the authority to transfer the domain.
4. Pay for the Transfer
Most registrars will charge a transfer fee, which typically includes the cost of renewing your domain for an additional year. Be sure to check the transfer fee at your new registrar before proceeding.
4. Approval Process
After you initiate the transfer, the old registrar will send a confirmation email to the administrative contact email address associated with the domain. This email typically contains a link to approve or deny the transfer.
- Approve the transfer: Click the approval link in the email to authorize the transfer. If you don’t approve the transfer, the process will be canceled.
- Deny the transfer: If you don’t approve the transfer, the domain will stay with your current registrar.
The approval process typically takes anywhere from 5 to 7 days, though it can take longer depending on the registrars involved.
5. Transfer Completion
Once the transfer is approved, the domain will officially be moved to the new registrar. Here’s what happens after the transfer:
1. Domain Transfer Confirmation
You’ll receive a confirmation email from your new registrar once the domain has been successfully transferred. The domain will now be under your new registrar’s management, and you can begin managing it there.
2. Domain Renewal
Most domain transfers include a one-year renewal, so your domain will be renewed for another year. However, it’s important to note that the renewal is added to the end of your current registration period. For example, if you had six months left on your domain, after the transfer, your domain’s registration will be extended by another year, giving you a total of 18 months.
3. DNS Propagation
After the domain is transferred, it may take some time for the DNS (Domain Name System) records to update across the internet. This is known as DNS propagation and typically takes anywhere from 24 to 48 hours to fully propagate.
During this time, your website and email services may experience some brief downtime. However, once propagation is complete, everything should return to normal.
6. Post-Transfer Tasks
Once the transfer is complete, there are a few final steps to ensure everything is set up correctly:
1. Re-enable Domain Privacy Protection (if desired)
If you disabled domain privacy protection during the transfer process, you can now turn it back on.
2. Verify Domain Settings
Log into your new registrar account and verify that all domain settings are correct, including:
- DNS settings: Make sure the DNS records are still pointing to the correct website and email servers.
- Domain renewals: Check that your domain is set to renew automatically to prevent future expiration issues.
3. Update Contact Information (if needed)
If any of your contact details have changed since the transfer, make sure to update them in the new registrar’s system.
7. Things to Keep in Mind When Transferring a Domain
While domain transfers are generally straightforward, here are a few things to keep in mind:
- Transfer lock: Some registrars impose a 60-day lock on newly registered or transferred domains. This means that you cannot transfer the domain again within the first 60 days after it’s been registered or transferred.
- Multiple domains: If you’re transferring multiple domains, some registrars offer discounts for bulk transfers.
- Email services: If your domain is linked to email services, make sure the transfer doesn’t interrupt your email access. You may want to check that email forwarding or other services are properly set up before transferring.
8. Conclusion
Transferring a domain name is a relatively simple process that can be completed in just a few steps. By following the steps outlined above and ensuring that your domain is ready for transfer, you can smoothly switch registrars without any major disruptions.
Remember to prepare ahead of time by checking your domain’s eligibility, unlocking it, and obtaining the Authorization Code. Once you initiate the transfer and approve the process, your domain will be moved to your new registrar, where you can continue managing it.
If you’re unhappy with your current registrar or simply want to take advantage of better services, transferring your domain can be a beneficial move. Just ensure that you follow the process carefully and stay on top of any emails or notifications that require your attention.


